iOS动画篇之CoreAnimation动画
App如果想被大众喜欢,漂亮的UI和精美的动画都是必不可少的,苹果虽然为UIView提供了一些常用动画,但是大部分看起来比较不错的效果都是通过操作Layer层实现的,因此了解核心动画是必要的.CoreAnimation是直接作用在CALayer上的(并非UIView上)非常强大的跨Mac OS X和iOS平台的动画处理API,Core Animation的动画执行过程都是在后台操作的,不会阻塞主线程。
介绍
开发中用的最多的是CoreAnimation动画库,简称是CA,所以动画类都是CA开头。所有的动画类都在QuartzCore库中,在iOS7之前使用需要#import <QuartzCore/QuartzCore.h>,iOS7之后系统已经将其自动导入了。CoreAnimation动画都是作用在layer上。
先来看下动画类的层级关系:
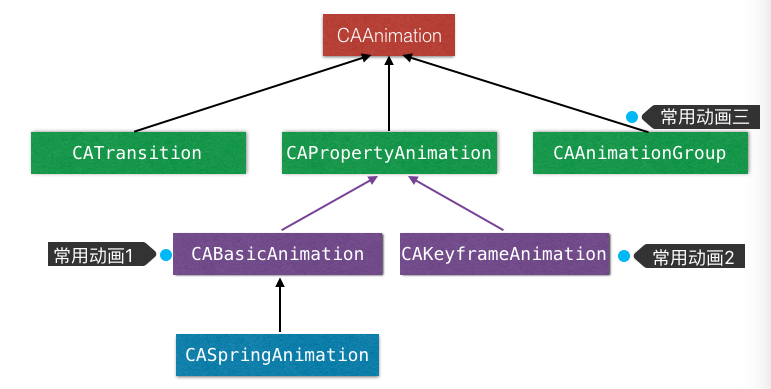
关于上图中的层级结构只需要了解一下,用的多了,自然就记住了。本篇只讲述CABasicAnimation、CAKeyframeAnimation、CAAnimationGroup的使用。
使用
上面讲了CA动画都是作用在Layer上,而CA动画中修改的也是Layer的动画属性,可以产生动画的layer属性也有Animatable标识。
1.CABasicAnimation
CABasicAnimation动画主要是设置某个动画属性的初始值fromValue和结束值toValue,来产生动画效果。
先上个示例代码,将一个视图往上移动一段距离:

|
- 动画的创建使用
animationWithKeyPath:,因为使用的keyPath所以动画属性或者其结构体中元素都可以产生动画。duration动画的时长。fromValue和toValue是CABasicAnimation的属性,都是id类型的,所以要将基本类型包装成对象。removedOnCompletion决定动画执行完之后是否将该动画的影响移除,默认是YES,则layer回到动画前的状态。fillMode是个枚举值(四种),当removedOnCompletion设置为NO之后才会起作用。可以设置layer是保持动画开始前的状态还是动画结束后的状态,或是其他的。autoreverses表示动画结束后是否 backwards(回退) 到动画开始前的状态。可与上面两个属性组合出不同效果。timingFunction动画的运动是匀速线性的还是先快后慢等,类似UIView动画的opitions。另外,CAMediaTimingFunction 方法可以自定义。delegate代理,两个动画代理方法:- (void)animationDidStart:(CAAnimation *)anim; 和- (void)animationDidStop:(CAAnimation *)anim finished:(BOOL)flag;-(void)addAnimation:(CAAnimation *)anim forKey:(nullable NSString *)key; 给某个layer添加动画,与之对应的移除某个动画是- (void)removeAnimationForKey:(NSString *)key;- 还有一些其他的属性,就不一一介绍了,可以在使用的使用去.h文件中查看。
在这里简单介绍一下fillMode
注意:fillMode这个属性,必须要配合下面这个属性来使用。这个属性的默认值是YES(回到原处),此时fillMode是没有作用的如果设置为NO那么就需要设置一个fillMode属性,就是动画结束之后的状态,如果不设置,动画也会回到原处。
postionAnimation.removedOnCompletion = NO;
kCAFillModeRemoved 这个是默认值,也就是说当动画开始前和动画结束后,动画对layer都没有影响,动画结束后,layer会恢复到之前的状态
kCAFillModeForwards 当动画结束后,layer会一直保持着动画最后的状态
kCAFillModeBackwards 这个和kCAFillModeForwards是相对的,就是在动画开始前,你只要将动画加入了
一个layer,layer便立即进入动画的初始状态并等待动画开始.你可以这样设定测试代码,将一个动画加入一个
layer的时候延迟5秒执行.然后就会发现在动画没有开始的时候,只要动画被加入了layer,layer便处于动画初
始状态
kCAFillModeBoth 理解了上面两个,这个就很好理解了,这个其实就是上面两个的合成.动画加入后开始之
前,layer便处于动画初始状态,动画结束后layer保持动画最后的状态.
Rotation旋转
- Z轴
CABasicAnimation *rotationAnimation = [CABasicAnimation animationWithKeyPath:@"transform.rotation"];
rotationAnimation.fromValue = [NSNumber numberWithFloat:0.0];
rotationAnimation.toValue = [NSNumber numberWithFloat:2*M_PI];
rotationAnimation.repeatCount = MAXFLOAT;
rotationAnimation.duration =10;
[self.rotationImgView.layer addAnimation:rotationAnimation forKey:@"transform.rotation.z"];
- X轴
CABasicAnimation *rotationXAnimation = [CABasicAnimation animationWithKeyPath:@"transform.rotation.x"];
rotationXAnimation.fromValue = [NSNumber numberWithFloat:0.0];
rotationXAnimation.toValue = [NSNumber numberWithFloat:2*M_PI];
rotationXAnimation.repeatCount = MAXFLOAT;
rotationXAnimation.duration =3;
[self.rotationXImgView.layer addAnimation:rotationXAnimation forKey:@"transform.rotation.x"];
- Y轴
CABasicAnimation *rotationYAnimation = [CABasicAnimation animationWithKeyPath:@"transform.rotation.y"];
rotationYAnimation.fromValue = [NSNumber numberWithFloat:0.0];
rotationYAnimation.toValue = [NSNumber numberWithFloat:2*M_PI];
rotationYAnimation.repeatCount = MAXFLOAT;
rotationYAnimation.duration =10;
[self.rotationYImgView.layer addAnimation:rotationYAnimation forKey:@"transform.rotation.y"];
Scale放大缩小
- 任意方向放大
CABasicAnimation *scaleAnimation = [CABasicAnimation animationWithKeyPath:@"transform.scale"];
scaleAnimation.fromValue = [NSNumber numberWithFloat:1.0];
scaleAnimation.toValue = [NSNumber numberWithFloat:1.5];
scaleAnimation.autoreverses = YES;//自动反向执行动画效果
scaleAnimation.repeatCount = MAXFLOAT;
scaleAnimation.duration = 0.8;
[self.scaleImgView.layer addAnimation:scaleAnimation forKey:@"FlyElephant.scale"];
- X轴放大
CABasicAnimation *scaleXAnimation = [CABasicAnimation animationWithKeyPath:@"transform.scale.x"];
scaleXAnimation.fromValue = [NSNumber numberWithFloat:1.0];
scaleXAnimation.toValue = [NSNumber numberWithFloat:1.5];
scaleXAnimation.autoreverses = YES;//自动反向执行动画效果
scaleXAnimation.repeatCount = MAXFLOAT;
scaleXAnimation.duration = 0.8;
[self.scaleXImgView.layer addAnimation:scaleXAnimation forKey:@"FlyElephant.scale.x"];
- Y轴放大
CABasicAnimation *scaleYAnimation = [CABasicAnimation animationWithKeyPath:@"transform.scale.y"];
scaleYAnimation.fromValue = [NSNumber numberWithFloat:1.0];
scaleYAnimation.toValue = [NSNumber numberWithFloat:1.5];
scaleYAnimation.autoreverses = YES;//自动反向执行动画效果
scaleYAnimation.repeatCount = MAXFLOAT;
scaleYAnimation.duration = 0.8;
[self.scaleYImgView.layer addAnimation:scaleYAnimation forKey:@"FlyElephant.scale.y"];
- Z轴放大
CABasicAnimation *scaleZAnimation = [CABasicAnimation animationWithKeyPath:@"transform.scale.z"];
scaleZAnimation.fromValue = [NSNumber numberWithFloat:1.0];
scaleZAnimation.toValue = [NSNumber numberWithFloat:1.5];
scaleZAnimation.autoreverses = YES;//自动反向执行动画效果
scaleZAnimation.repeatCount = MAXFLOAT;
scaleZAnimation.duration = 0.8;
[self.scaleZImgView.layer addAnimation:scaleZAnimation forKey:@"FlyElephant.scale.z"];
Translation平移
- X轴平移
CABasicAnimation *translationX=[CABasicAnimation animationWithKeyPath:@"transform.translation.x"];
translationX.toValue=@(200);
translationX.duration=5;
translationX.removedOnCompletion=NO;
translationX.fillMode=kCAFillModeForwards;
translationX.repeatCount=MAXFLOAT;
translationX.autoreverses=YES;
[self.translationXImgView.layer addAnimation:translationX forKey:@"FlyElephant.translation.x"];
- Y轴平移
CABasicAnimation *translationY=[CABasicAnimation animationWithKeyPath:@"transform.translation.y"];
translationY.toValue=@(100);
translationY.duration=5;
translationY.removedOnCompletion=NO;
translationY.fillMode=kCAFillModeForwards;
translationY.repeatCount=MAXFLOAT;
translationY.autoreverses=YES;
[self.translationYImgView.layer addAnimation:translationY forKey:@"FlyElephant.translation.y"];
- XY轴平移
CABasicAnimation *translation=[CABasicAnimation animationWithKeyPath:@"transform.translation"];
translation.toValue=[NSValue valueWithCGPoint:CGPointMake(100, 100)];
translation.duration=5;
translation.removedOnCompletion=NO;
translation.fillMode=kCAFillModeForwards;
translation.repeatCount=MAXFLOAT;
translation.autoreverses=YES;
[self.translationImgView.layer addAnimation:translation forKey:@"FlyElephant.translation"];
动画实例图:

2.CAKeyframeAnimation
CAKeyframeAnimation我们一般称为关键帧动画,主要是利用其values属性,设置多个关键帧属性值,来产生动画。
基于Scale变换:
CAKeyframeAnimation *keyAnimation = [CAKeyframeAnimation animationWithKeyPath:@"transform"];
keyAnimation.duration = 1.0f;
keyAnimation.beginTime = CACurrentMediaTime() + 1.0;

CATransform3D transform1 = CATransform3DMakeScale(1.5, 1.5, 0);
CATransform3D transform2 = CATransform3DMakeScale(0.8, 0.8, 0);
CATransform3D transform3 = CATransform3DMakeScale(3, 3, 0);

keyAnimation.values = @[[NSValue valueWithCATransform3D:transform1],[NSValue valueWithCATransform3D:transform2],[NSValue valueWithCATransform3D:transform3]];
keyAnimation.keyTimes = @[@0,@0.5,@1];
keyAnimation.timingFunction = [CAMediaTimingFunction functionWithName:kCAMediaTimingFunctionEaseInEaseOut];
keyAnimation.removedOnCompletion = NO;
keyAnimation.fillMode = kCAFillModeForwards;
[_someView.layer addAnimation:keyAnimation forKey:nil];
beginTime也是CAAnimation类的属性,可以设置动画延迟多久执行,示例代码是延迟1秒执行。values是CAKeyframeAnimation的属性,设置keyPath属性在几个关键帧的值,也是id类型的。keyTimes也是CAKeyframeAnimation的属性,每个值对应相应关键帧的时间比例值。timingFunctions也是CAKeyframeAnimation的属性,对应每个动画段的动画过渡情况;而timingFunction是CAAnimation的属性。
基于Point的变换:

CGPoint p1=CGPointMake(self.positionImgView.center.x, self.positionImgView.center.y);
CGPoint p2=CGPointMake(80, 100);
CGPoint p3=CGPointMake(100, 120);

CGPoint p4=CGPointMake(120, 150);
CGPoint p5=CGPointMake(140, 160);
NSArray *values=[NSArray arrayWithObjects:[NSValue valueWithCGPoint:p1],[NSValue valueWithCGPoint:p2],[NSValue valueWithCGPoint:p3],[NSValue valueWithCGPoint:p4],[NSValue valueWithCGPoint:p5], nil];
CAKeyframeAnimation *animation = [CAKeyframeAnimation animationWithKeyPath:@"position"];
[animation setValues:values];
[animation setDuration:10.0];
[animation setCalculationMode:kCAAnimationCubic];
animation.timingFunction=[CAMediaTimingFunction functionWithName:kCAMediaTimingFunctionEaseIn];
[self.positionImgView.layer addAnimation:animation forKey:@"FlyElephant.point"];
基于Path的变换:

CGMutablePathRef path = CGPathCreateMutable();
CGPathMoveToPoint(path,NULL,self.positionImgView.center.x,self.positionImgView.center.y);
for(NSInteger i = 1; i < 5 i++){
    CGPathAddLineToPoint(path, NULL, self.positionImgView.center.x+i*10,     self.positionImgView.center.y);
}
//曲线
CGPathAddCurveToPoint(path,NULL,50.0,275.0,150.0,275.0,70.0,120.0);
CGPathAddCurveToPoint(path,NULL,150.0,275.0,250.0,275.0,90.0,120.0);
CGPathAddCurveToPoint(path,NULL,250.0,275.0,350.0,275.0,110.0,120.0);
CGPathAddCurveToPoint(path,NULL,350.0,275.0,450.0,275.0,130.0,120.0);
CAKeyframeAnimation *animation = [CAKeyframeAnimation animationWithKeyPath:@"position"];
[animation setPath:path];
[animation setDuration:3.0];
// [animation setAutoreverses:YES];
CFRelease(path);
[self.positionImgView.layer addAnimation:animation:@"FlyElephant"];
通过代码我们发现,Path和values接收都是一个数组,而不是一个固定值,这里面我们没有设置keyTimes,下面看一个常见的抖动效果:
CAKeyframeAnimation *animation = [CAKeyframeAnimation animation];
animation.keyPath = @"position.x";
animation.values = @[ @0, @20, @-20, @20, @0 ];
animation.keyTimes = @[ @0, @(1 /8.0), @(1/ 2.0), @(7/ 8.0), @1 ];
animation.duration =0.5;
animation.additive = YES;
[self.textField.layer addAnimation:animation forKey:@"FlyElephant.Shake"];
3.CAAnimationGroup
CAAnimationGroup的用法与其他动画类一样,都是添加到layer上,比CAAnimation多了一个animations属性。
先看示例代码,动画效果是视图一边向上移动,一边绕Y轴旋转:
CABasicAnimation *rotationYAnimation = [CABasicAnimation animationWithKeyPath:@"transform.rotation.y"];
rotationYAnimation.fromValue = @0;
rotationYAnimation.toValue = @(M_PI);
rotationYAnimation.timingFunction = [CAMediaTimingFunction functionWithName:kCAMediaTimingFunctionEaseInEaseOut];

CABasicAnimation *postionAnimation = [CABasicAnimation animationWithKeyPath:@"position.y"];
postionAnimation.fromValue = @(_markView.center.y);
postionAnimation.toValue = @(_markView.center.y - 100);
postionAnimation.timingFunction = [CAMediaTimingFunction functionWithName:kCAMediaTimingFunctionEaseInEaseOut];

CAAnimationGroup *animationGroup = [CAAnimationGroup animation];
animationGroup.duration = kUpDuration;
animationGroup.removedOnCompletion = NO;
animationGroup.fillMode = kCAFillModeForwards;
animationGroup.delegate = self;
animationGroup.animations = @[rotationYAnimation, postionAnimation];

[_markView.layer addAnimation:animationGroup forKey:kJumpAnimation];
CAAnimationGroup的animations中可以放其他任何动画类(包括CAAnimationGroup),需要注意的是animations里的动画设置了duration之后动画可能会有不同,一般里面不设置,在最外层设置group的duration即可。
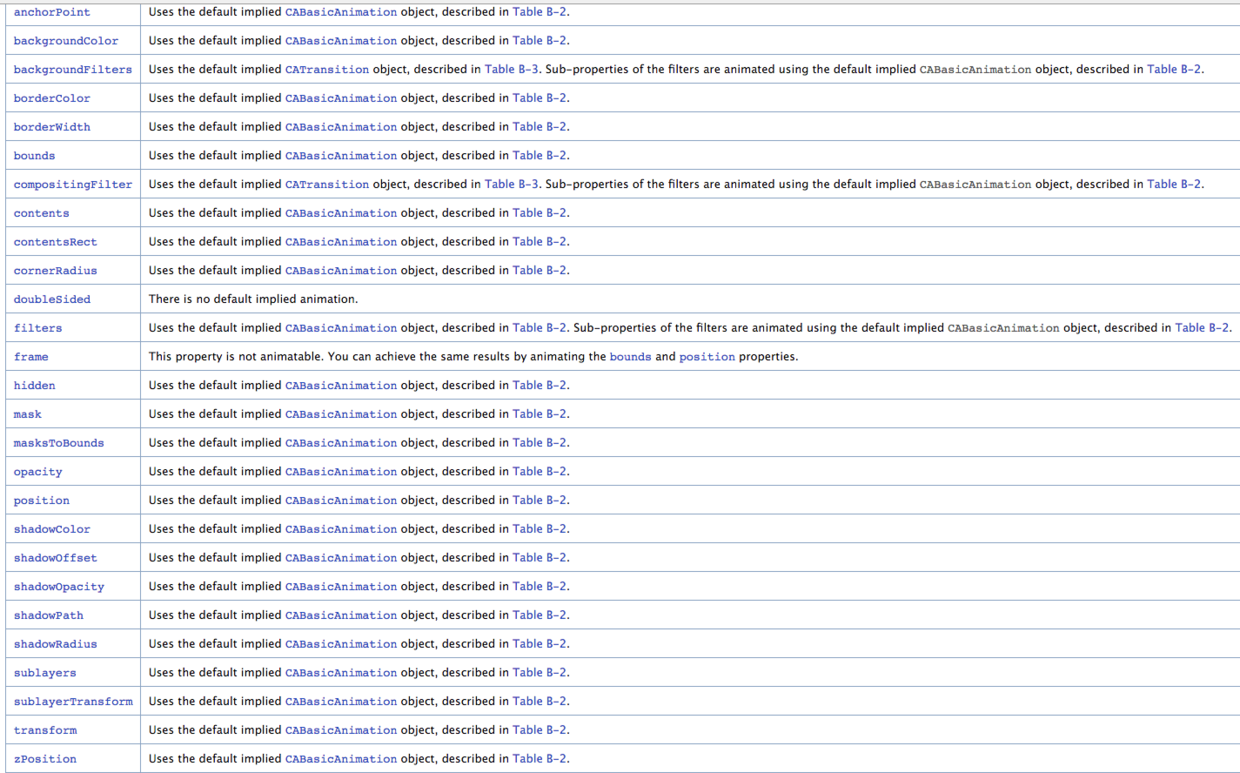
AnimationWithKeyPath的值
最开始做动画一般都会对keyPath这个值莫名其妙,因为它不是常量,需要变换的时候找不到对应的需要设置的值,如果你在网上搜索,很可能看到的是这张图:

下面这张图你基本上是找不到的,如下:
4.CATransition
CATransition一般来做转场动画。先上gif动画效果

//修改视图的背景色
_someView.backgroundColor = [UIColor greenColor];
CATransition *animation = [CATransition animation];
animation.duration = 0.5;
/* 这里可设置的参数有:kCATransitionFade、kCATransitionPush、kCATransitionReveal、kCATransitionMoveIn、
"cube"、"suckEffect"、"oglFlip"、"rippleEffect"、"pageCurl"、"pageUnCurl"、"cameraIrisHollowOpen"、
 "cameraIrisHollowClose",这些都是动画类型
*/
animation.type = @"cube";
// 动画执行的方向,kCATransitionFromRight、kCATransitionFromLeft、kCATransitionFromTop、kCATransitionFromBottom
animation.subtype = kCATransitionFromRight;
animation.timingFunction = UIViewAnimationOptionCurveEaseInOut;
[_someView.layer addAnimation:animation forKey:nil];
//也可以写这里
//    _someView.backgroundColor = [UIColor greenColor];
只需要在动画开始前或者动画开始后替换掉视图上显示的内容即可。具体可以看我的这篇博客iOS动画之CATransition动画
附加
附加的内容是关于CALayer和UIBezierPath。个人觉得理解了UIBezierPath和CALayer,才能更好的理解CoreAnimation动画。
1.UIBezierPath
UIBezierPath主要是用来绘制路径的,分为一阶、二阶…..n阶。一阶是直线,二阶以上才是曲线。而最终路径的显示还是得依靠CALayer。用CoreGraphics将路径绘制出来,最终也是绘制到CALayer上。

方法一:构造bezierPath对象,一般用于自定义路径。
方法二:绘制圆弧路径,参数1是中心点位置,参数2是半径,参数3是开始的弧度值,参数4是结束的弧度值,参数5是是否顺时针(YES是顺时针方向,NO逆时针)。
方法三:根据某个路径绘制路径。
方法四:根据某个CGRect绘制内切圆或椭圆(CGRect是正方形即为圆,为长方形则为椭圆)。
方法五:根据某个CGRect绘制路径。
方法六:绘制带圆角的矩形路径,参数2哪个角,参数3,横、纵向半径。
方法七:绘制每个角都是圆角的矩形,参数2是半径。
自定义路径时常用的API:
- (void)moveToPoint:(CGPoint)point; // 移到某个点
- (void)addLineToPoint:(CGPoint)point; // 绘制直线
- (void)addCurveToPoint:(CGPoint)endPoint controlPoint1:(CGPoint)controlPoint1 controlPoint2:(CGPoint)controlPoint2; //绘制贝塞尔曲线
- (void)addQuadCurveToPoint:(CGPoint)endPoint controlPoint:(CGPoint)controlPoint; // 绘制规则的贝塞尔曲线
- (void)addArcWithCenter:(CGPoint)center radius:(CGFloat)radius startAngle:(CGFloat)startAngle endAngle:(CGFloat)endAngle clockwise:(BOOL)clockwise
// 绘制圆形曲线
- (void)appendPath:(UIBezierPath *)bezierPath; // 拼接曲线
如果将路径显示的图案显示到视图上呢?
有三种方式:1、直接使用UIBezierPath的方法;2、使用CoreGraphics绘制;3、利用CAShapeLayer绘制。
示例代码如下,绘制一个右侧为弧型的视图:

- (void)drawRect:(CGRect)rect
{
    UIColor *fillColor = [UIColor colorWithRed:0.0 green:0.722 blue:1.0 alpha:1.0];

    UIBezierPath *bezierPath = [UIBezierPath bezierPath];
    [bezierPath moveToPoint:CGPointMake(0, 0)];
    [bezierPath addLineToPoint:CGPointMake(rect.size.width - spaceWidth, 0)];
    [bezierPath addQuadCurveToPoint:CGPointMake(rect.size.width - spaceWidth, rect.size.height) controlPoint:CGPointMake(rect.size.width - spaceWidth + _deltaWith, rect.size.height * 0.5)];
    [bezierPath addLineToPoint:CGPointMake(0, rect.size.height)];
    [bezierPath addLineToPoint:CGPointMake(0, 0)];
    [bezierPath closePath];

    // 1、bezierPath方法
//    [fillColor setFill];
//    [bezierPath fill];

    // 2、使用CoreGraphics
//    CGContextRef ctx = UIGraphicsGetCurrentContext();
//    CGContextAddPath(ctx, bezierPath.CGPath);
//    CGContextSetFillColorWithColor(ctx, fillColor.CGColor);
//    CGContextFillPath(ctx);

    // 3.CAShaperLayer
    [self.layer.sublayers makeObjectsPerformSelector:@selector(removeFromSuperlayer)];
    CAShapeLayer *shapeLayer = [CAShapeLayer layer];
    shapeLayer.path = bezierPath.CGPath;
    shapeLayer.fillColor = fillColor.CGColor;
    [self.layer addSublayer:shapeLayer];
}
上图这样的视图是用UIBezierPath用多个CAShapeLayer制作出来的,而动画效果只需要改变进度的layer的strokeEnd和修改下面代表水面进度的视图位置即可。动画的组合也可以有多种方式组合
动画的示例代码:
- (void)setProgress:(CGFloat)progress animated:(BOOL)animated duration:(NSTimeInterval)duration
{
    CGFloat tempPro = progress;
    if (tempPro > 1.0) {
        tempPro = 1.0;
    } else if (progress < 0.0){
        tempPro = 0.0;
    }
    _progress = tempPro;

    CABasicAnimation *pathAniamtion = [CABasicAnimation animationWithKeyPath:@"strokeEnd"];
    pathAniamtion.duration = duration;
    pathAniamtion.timingFunction = [CAMediaTimingFunction functionWithName:kCAMediaTimingFunctionEaseInEaseOut];
    pathAniamtion.fromValue = [NSNumber numberWithFloat:0.0f];
    pathAniamtion.toValue = [NSNumber numberWithFloat:_progress];
    pathAniamtion.autoreverses = NO;
    [_progressLayer addAnimation:pathAniamtion forKey:nil];

    // 水位上升的动画
    if (!_showSolidAnimation) {
        return;
    }

    dispatch_after(dispatch_time(DISPATCH_TIME_NOW, (int64_t)(0 * NSEC_PER_SEC)), dispatch_get_main_queue(), ^{
        _imageView.transform = CGAffineTransformIdentity;
        [UIView animateWithDuration:duration animations:^{
            CGRect rect = _imageView.frame;
            CGFloat dy = rect.size.height * progress;
            _imageView.transform = CGAffineTransformMakeTranslation(0, -dy);
        }];
    });
}
在用自定义的CAShapeLayer做动画时,建议在动画开始前先将动画属性与最终的属性值一致,再开始动画,不要使用removedOnCompletion控制最终的状态,这在WWDC苹果这么建议。
具体UIBezierPath可以看这篇文章UIBezierPath详解